Premium grade flooring is all we can say about the wood floors manufactured by Country Flooring. With better than average lengths and superior grading standards Country Flooring is our favorite manufacturer of quality hardwood floors.
The Finishing Process
All Country Flooring products are finished with 7 coats of UV cured aluminum oxide finish offering a 25 yr warranty.
Precise Milling
The flooring is tongue and groove on all 4 sides ensuring the best installation possible. (end matched)Minimum lengths on all products of 15” compared to the industry standard of 9” for other manufacturers makes for a faster installation as well as a more aesthetically appealing look. The edges are micro-beveled with the smallest micro bevel in the industry to protect the edges of the flooring during the installation.
The grading of Country Wood Flooring is Simple.
Prime Grade= Clear / Select and Better - For a clean, uniform look.
Select Grade = Primarily Prime grade material with a small amount of variation.
Standard Grade = Select and #1 mix.(Allows for color variation, and knots) - For a natural looking floor that contains natural characteristics.
Country Grade = Will contain a mixture of all grades, (allows for high degrees of color variation and knots) Will not contain open hole knots - nearly 100% usable material.
Nail Down
Solid Strip & Plank Installation Methods
A. Always follow the manufacturers recommended installation procedure.
B. Unfinished and factory-finished solid plank should be installed perpendicular to the joists or on a diagonal for any single layer subfloor. (Exception: Over diagonal, solid subfloor boards, install perpendicular to joists or subfloor direction.)
C. When ¾" solid plank flooring is laid parallel with the floor joists, follow one of these two steps:
1. Add a layer of minimum nominal ½" (15/32â€) CD Exposure 1 (CDX) plywood underlayment to the existing subfloor (as previously recommended)
2. Or brace between truss/joists in accordance with the truss/joist manufacturer’s recommendations and with local building codes. Some truss/joist systems cannot be cross-braced and still maintain stability.
D. Before installing wood flooring, place an approved vapor retarder. Some examples of acceptable vapor retarders over wood subfloors include:
1. An asphalt laminated paper meeting UU-B-790a, Grade B, Type I, Style 1a.
2. Asphalt-saturated kraft paper or #15 or #30 felt that meets ASTM Standard D-4869 or UU-B-790, Grade D.
E. Wall Line Layout
1. Choose a starting wall according to the most aesthetically or architecturally important elements in the room, taking into consideration fireplaces, doors, cabinets and transitions, as well as the squareness of the room. The starting wall will often be the longest unbroken wall in the room.
2. Snap a working line parallel to the starting wall, allowing ¾†expansion space between the starting wall and the edge of the first strip or plank run.
3. As a general rule, a ¾†expansion space must be left around the perimeter and at all vertical obstructions.
4. Random-width plank is laid out with alternating courses varying by widths. Start with the widest board, then the next width, etc., and repeat the pattern.
5. Lay one row of strip or plank along the entire length of the working line.
6. Top-nail and blind-nail the first row (hand-nail if necessary), using appropriate fasteners. Denser species may require pre-drilling. Each succeeding row should be blind-nailed with the nailing machine wherever possible. At the finishing wall and other obstructions, it may be necessary to blind-nail by hand until top nailing is required.
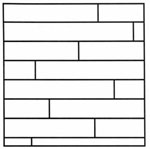
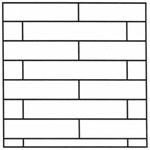
7. Racking rule of thumb: Stagger end-joints in adjacent rows at least three times the width of the boards, as product allows. Avoid H-joints. (See Figures 1 and 2.)
|
Figure 1 Stagger End Joints |
|
Figure 2 Avoid “H†Joints |
 |
|
 |
8. To minimize expansion on floors wider than 20 feet, more or less spacing between rows may be needed, depending on geographical area, interior climate control and time of the year.
9. Where spacing is required: Use a washer or removable spacer to leave additional space
every few rows and/or start in center of room and work out to both sides. Do not use
spacers that may cause damage on factory-finished products.
10. Nailing: Blind-nail through the tongue using 1½"-2†fasteners. Use 1½" fasteners with
nominal ¾" plywood subfloor direct to concrete slab. Face-nail boards where needed
using 6d-8d casing or finish nails. Fasteners should be spaced every 6â€-8†on blindnailing,
or every 10â€-12†on face-nailing.
11. For additional fastening, any of the following options may be used in addition to the
nailing schedule. (See Appendix F, Fastener Schedule.)
12. Follow manufacturer’s instructions for installing plank flooring.
13. For wide-width plank flooring (5†or wider), to assist the nailing schedule of 6â€-8†and
increase holding power, there are three options.
a. Screw and plug at end joints, alternating at staggered locations and intervals along
each board.
b. Apply an approved wood flooring adhesive.
c. Use kerfing or relief cuts every 8†to 12†parallel to the grain – using more relief cuts
for wider boards. Typically, the relief cut should be 3/8†on a ¾†board.
NOTE: These options, however, will not necessarily eliminate cupping.
14. Blind-nail and face-nail, as necessary, to complete the final rows.
F. Center Line Layout
NOTE: For instructions on using the trammel point method to square a room and find
the center point, see Appendix G, Trammel Point Method.
1. Find the center of your room, measuring off the two longest walls, and snap a line down
the center of that room.
Copyright 2007 National Wood Flooring Association 13 Revised March 2007
Chapter 9 Solid Strip & Plank Flooring Installation
2. Install a starter board on the line. Fasten the starter board to the floor using wood
screws.
3. Nail the first row of wood flooring against the starter board, being careful not to move the
starter board when nailing. The groove of the flooring should be against the starter
board.
4. Drill and hand-nail the first three rows through the tongue. DO NOT USE TOP NAILS.
5. Use a blind nailer to install the remaining rows of wood flooring. Use the nailing practices
described earlier in the chapter.
6. After installing in one direction, remove the starter board and start rows going in the
opposite direction.
7. Install a spline or a slip tongue in the groove of the board that was against the straightedge.
Put wood glue down the entire length of the groove before installing the spline.
8. Install the spline using a blind nailer. To keep the spline in alignment for the next flooring
board, use a scrap piece of wood flooring to run along the length of the spline as you
nail.
9. Install the remaining rows in the opposite direction. Use the nailing practices described
earlier in the chapter.


